PRACTICE Setup


Home / Practice Setup

A MINIMALIST DENTAL CLINIC

A Dental Clinic having a good ambience is everyone’s choice, be it the dentist himself or any patient.
Since, patients are used to many well-designed hospital environments, therefore, as a
dentist, our main goal should be to provide the amazing patient experience as soon as he/she enters your clinic.
Following are some of the simplest steps you can consider while planning the design and setup of your dental practice.

Clean & Hide the Clutter
Auxiliary Technology
Modular System
Dental Chair & its Position

STEP 1

Set Your Dental Clinic Design Goals

Considerations regarding the look and feel of a dental office. are ideally handled by
a dental architect or designer. 
Design goals should be tailored for specialty practices like Endodontics, Orthodontics,
Paediatrics or Oral Surgery 0peratory.
design modern day rooms that will still look and be current in the future. 
Consider the following five goals:

INVEST IN ONLY ESSENTIAL TECHNOLOGY

Of course, the more the gadgets, the more attractive your clinic might look to the patient. But when a patient comes with a problem, the only thing he wants is the solution. And obviously, any number of bigger and expensive machines can’t match the proficiency of a dentist’s diagnosis. Dentists should invest according to the usability and value of the
technology. Compare different technologies, and invest in the best suitable one for your clinic.

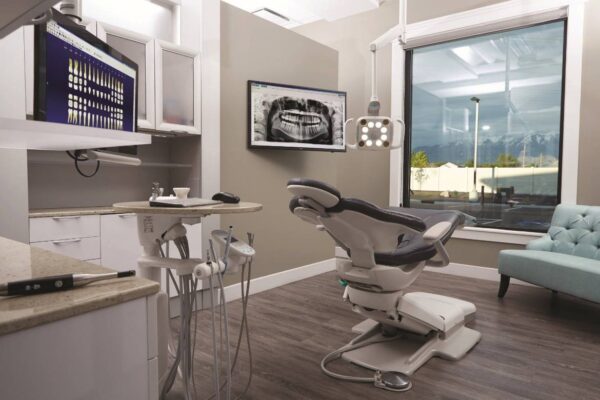
ENHANCE PATIENT EXPERIENCE & PERCEPTION

Current dental patients have become accustom to modern open designs and are
expecting better clinic areas. Avoid manufacturers who insist on selling their relic arm designs. 
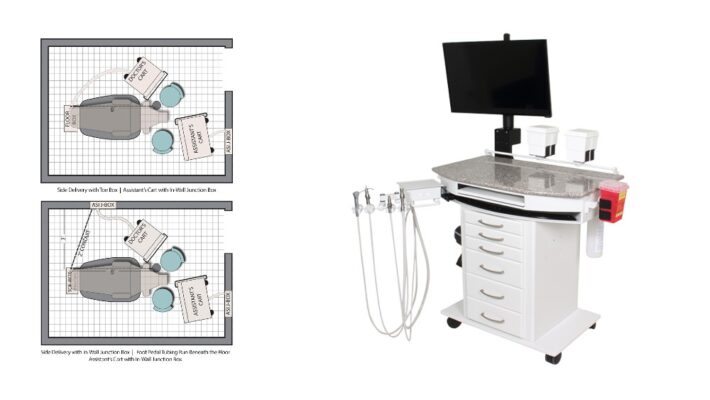
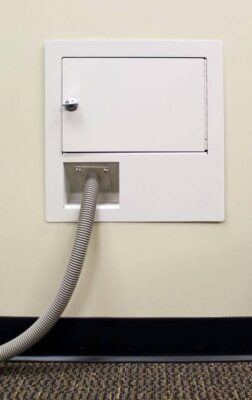
Enhance the patient experience and perception through the technological interface used during procedures and by removing unsightly clutter of cabling, wires and extra foot controls. 
Clutter equals stress.  Remove the clutter, open the room, let the patient “own” their dental chair space and integrate the technology.

IMPROVE EFFICIENCY

Improve treatment efficiency to minimize the amount of time, allowing more procedures to be performed in one day without compromising quality.
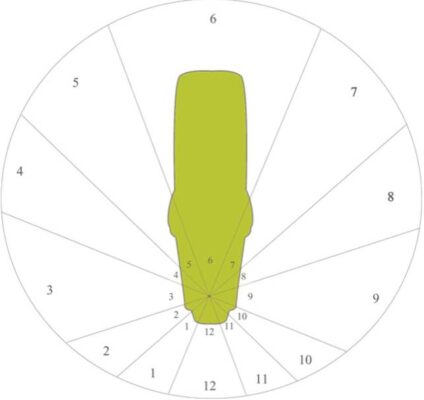
ERGONOMICS

Ergonomic positioning and methodology for both the dentist, the assistant as well as the patient is of utmost importance. This improves the mental focus of the team and can enhance patient perception during the procedure.

FLEXIBLE

Have a flexible operatory space that can be easily reconfigured as needed or upgraded with new technology as it becomes available.

STEP 2

Select the Dental Clinic’s Layout and Size

Dental treatment rooms usually follow three general concepts:

Open – is an open bay with multiple patient chairs contained in the room.

  • Advantage: highly cost effective,
  • Disadvantage: the non-privacy aspect doesn’t permit wide use.
  • Common E.g.: orthodontic type practices.

Single Entry – is separated by walls to divide operatories and provides the most
patient privacy due to only one entry into the room.

  • Advantages:
    1, can allow for smaller room design by eliminating a second entry, so
    can be more economical
    2, permit more density of operatories for limited office floor space.  
  •  Disadvantage: can restrict staff movements in and out of the room during
    treatment.
  • Recommendation: proper planning and use of modular system to ensure
    uninterrupted traffic flow.

Dual Entry – is separated by walls to divide operatories and provides reasonable patient privacy.

  • Advantage: it well facilitates patient and staff traffic by allowing entry from either side of the patient chair and room. 

  • Disadvantage: requires a wider room design to permit a second entry.

STEP 3

Think Beyond the Dental Cabinet

Create a custom operatory design that:

  • Will be flexible enough to grow with you to help you to achieve your ultimate financial goals.
  • Allows modular integration that significantly saves on office build out costs by eliminating traditional expensive and bulky wooden dental cabinets.

Dental Cabinets….NO PLEASE! Choose MODULAR CABINET SYSTEM

  • They can also work well in conjunction with digital radiography, microscopes and computerized inputs.
  • It allows the clinician to manoeuvre their system within close reach during the procedure.
  • It can be repositioned out of patient view after the procedure is complete.
  • A monitor mount creates an intimate environment for both patient education and clinical use.
  • The attractive work top provides ample space for a keyboard and mouse.

STEP 4

Select the Dental Chair Position and Location to Determine the Dental Operatory Design and Size

This can affect room size, ergonomics, patient experience, and practice productivity. It will optimize procedures for you and your dental assistant or hygienist. It is important to evaluate and select your convenience i.e., from side, rear or over-the-patient delivery.   


To associate the location for the various names is to use the clock diagram, to describe the positioning of instrument access by the Doctor and Assistant. 

The patient’s head is at the 12 O’clock position while the patient’s feet would be indicated at the 6 O’clock position.

A right-handed dentist could sit at the 11 O’ clock position and retrieve the instruments from their front side at the 9 to 10 O’ clock position while the assistant sits at the 3 O’ clock position.

Ways to Plan out an Ambidextrous Use

  • Attach Side/Front delivery dental carts to a floor junction box located in the centre of the room under the foot of the patient chair and then be rolled to either side as needed.
  • An In-Wall junction box can be placed on both sides of the room to allow the dental cart to be moved to configure the room for right or left-handed use. 
  • Rear wall delivery carts have a sliding track that allows dental and assistant’s instruments to move to either side of the dental cart for ambidextrous use.


STEP 5

Plan for the Dental Assistant to Achieve Efficient Instrument and Treatment Capability

  • Ideally, Assistant’s instruments should be located in the rear of the room and not off the side of the chair. This way they are facing the assistant and are easy to access.
  • Assistant’s instruments post-mounted off of the chair, should only be considered if the room dimensions do not allow rear delivery. This is to avoid the poor ergonomics and inefficient access for the assistant.
  • They can provide work surface holding trays, supplies and auxiliary equipment such as keyboards. Modular systems that easily roll can provide ideal preferred ergonomic placement of instruments, supplies and monitor viewing for the assistant.
  • They can be moved to allow the assistant’s egression in a single entry dental operatory layout.


STEP 6

Configure Your Dental Delivery System for the Way You Practice

  • Nowadays, each modular panel accommodates a wide range of electronic instrumentation including electric high-speed motors, surgical motors, rotary motors, ultrasonics, apex locators and obturation devices.
  • Select from various brands while choosing the placement of each instrument, and control them all with a single foot pedal. 
  • The modular design allows for easy up-gradeability of your instruments or incorporation of new technology as it develops.
  • The handpiece bar can accommodate an abundance of instruments that can be configured to the way you practice.
  • Accessory brackets can also be utilized to add work trays or additional instrumentation to the sides of the delivery system.
  • The customizable configuration allows ergonomic and efficient hand access to the instruments you need when you need them.

STEP 7

Integrate Auxiliary Technology (If Any)


Consider designing your system to neatly integrate computer monitors, USB connection ports for digital radiography, CPUs, 3D microscopes, camera recorders and any additional required cabling within the system with convenient access. This makes the entire system your communication control hub from treatment instruments to diagnostic devices.

Patient Experience Opportunity

  • Adding a computer monitor on top of the delivery system is an easy method to make it look less intimidating and more diagnostic.
  • Patients have become accustom to a wide range of hospital diagnostic units, such as ultrasound devices that look like mini-computer carts. Making the treatment unit resemble more of a medical diagnostic cart elevates the specialization of your practice, and makes it more disarming at the same time.
  • Having a front side monitor is also ideal for providing patient education and treatment planning.

STEP 8

Plan for Cable and Utility Management

Convey the ultimate perception to your patient that the treatment they are receiving is a highly specialized procedure from someone with true expertise.

Consider the patient’s perspective of value and confidence while in a fully-integrated, seamless treatment room rather than looking at scattered instrument control boxes, multiple foot pedals, and a multitude of cords draped across countertops.

It is important to keep power/ computer wiring and utilities safely and attractively hidden from view. 

Use internal cord management and storage within the cart to neaten the appearance of the delivery cart. 

A single umbilical allows compressed air, suction, electrical and computer data cables (network, USB, video) to be neatly organized and routed to either an In-Wall or In-Floor Junction box.

Foot Control Placement

The foot control tubing can be run underneath the floor through a conduit from the junction box to the patient dental chair.

The end result creates easy access to the foot control without tubing running across the floor.


STEP 9

Plan for Seamless Utility Connections for the Delivery Systems


Dental Junction Boxes

  • Select from a modern style of dental junction boxes to efficiently manage, conceal and protect your dental operatory air, suction, electrical, computer data cables and chair controls.
  • Select from a variety of durable models including In-Wall, In-Floor and Above-Floor to meet your requirements.
  • he In-Floor and Above Floor models are generally placed at the foot of the dental patient chair and can provide ambidextrous use of a cart to be moved on either the right or left side of the room. 
  • The In-Wall Model is placed in the side wall of the treatment room and allows the dental cart to be placed up to the wall for a neat appearance.

Plumb Free Connections

  • Self-Contained Dental Carts with internal compressed air and vacuum only require a connection to a standard electrical outlet for operation. This makes their placement in the room very flexible and adaptable.
  • This feature can also be very practical when renovating an existing space or adding a treatment room into an area of the office that wasn’t plumbed.

STEP 10

Hire a Professional Design Team

  • Once you have completed all the preliminary planning for your dental operatory layouts including dental equipment styles, it’s then time to decide how you want your office to appear and be organized around your clinical areas. 
  • Ask yourself, Do you need to hire a dental architect? 
  • Carefully select who is going to design it and determine if they have experience with the nuances of dental operatory design including utilities, med gas and ideal technology connections.
  • Choosing to use the design services of a dental distributor, and electing an architect that specializes in dental office design, is generally preferred by various dentists.

Your decision should depend on

  • The extent of your project,
  • Whether you are renovating an existing dental space or planning complete ground-up building construction.
  • Cost and style factors.

6-month Warranty Clinical Micromotor with Control Box and Foot Pedal

Starting Your Own Practice? Best Air-compressor at Reasonable Price


Best COMBO OFFER!
Air Compressor + Pneumatic Impact Wrench and Fittings


Special Offer! Silent and Oil-Free Dental Air-cpmpressor of 50 litres Volume


SAVE ₹20000 + FREE DELIVERY! Addler Dental Chair with Advance Features + Saddle Stool.


Standard Book for Oral Medicine


Study The In & Out General Medicine. CLICK HERE